Whenever you have to send mass email or newsletters to your subscribers, you can use Email marketing service providers like Mailchimp. It’s a versatile tool which can help you to automate the email marketing and send bulk email to targeted audiences. To use MailChimp you need to know how to use it effectively.
This guide will help you to capture your subscribers’ attention with your email by adding a text wrap to your email. It will help to increase your open rate and click through rate in your campaigns.
Let’s get started!
8 Steps To Wrap Text in Mailchimp
The following 8 steps will show you how to wrap text in Mailchimp.
Step 1
Select Design Email from the Content section of the Campaign Builder.

Step 2
In step 2, you can either drag and drop a new content block or click an existing content block on the Design step.
Step 3
Click on the text area where you want to place the image in the editing pane.
Step 4
In the toolbar, click the Content Studio icon to select an image.

Here are some steps to help you choose an image that meets your needs:
- If you want to use an image you have already uploaded, click on the image and then click Insert.
- If you want to use a file from your computer, click Upload, find the file, and click Open.
- Choose Import from the URL drop-down menu next to Upload to import an image you’ve saved online. Click import after entering the URL.
Step 5
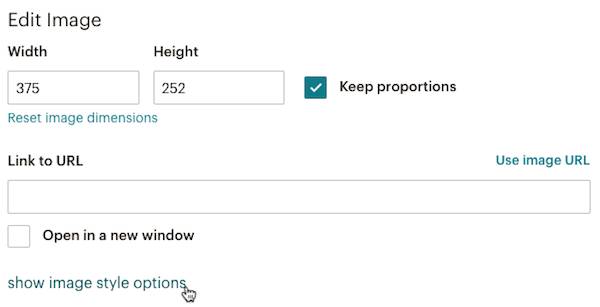
Select show image style options from the Edit Image screen.

Step 6
Align your image to the left or right, or centre it within your text, by selecting the Align drop-down menu.

Step 7
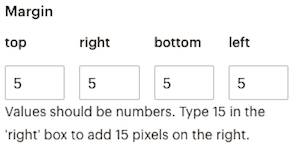
To add space between your image and text wrapped around it, enter a number in the Margin fields.

Step 8
As a final step click Save & Insert Image.

Conclusion
A number of reasons can be cited for wrapping text. This enhances the readability of the text and makes it easier for the reader to scan the entire list. In this article, we’ve explained how to wrap text in Mailchimp. Thank you for taking the time to read this guide. I hope you find it useful.


![40 Best SEO Audit Tools Experts using in 2023 [Free & Paid]](https://quatmarketing.com/wp-content/uploads/2023/06/best-seo-audit-tools-120x86.webp)


