Mailchimp is one of the simple email marketing tools that sends emails in bulk format. You can create templates and merge tags to create multiple recipients lists, or you can create a campaign that will send emails to all your contacts. You might be thinking why we need columns in Mailchimp. Columns will make your email look better and clean. You can add a background in each column as per your choice. In this blog, you can learn how to add columns in Mailchimp.
How To Add Columns? [Step by Step Guide]
The following steps are to be followed to add columns in Mailchimp.
- Choose a “Text” content block for the same Style option but without background style options. Select the “Boxed Text” block. Here are the steps you need to follow to insert “Boxed Text” into your layout:
- Drag and drop the “Boxed Text” block into your layout.

- You can add text to the “Content” tab. When pasting content from an external source, such as a word processor or a website, use a “Rich Text Editor” or enter the paste as plain text. This is necessary so that you don’t have to add some extra styling code.

- After making the necessary changes to the Settings tab and Style, click Save and Close.
Edit Settings and Style
Follow the steps below to edit the Settings and Style of the “Boxed Text” content block:
- If you are willing to proceed with the “Boxed Text” block, click on it.
- Change the style of the content block in the “Style” tab. This thing allows you to change the alignment of the text, line height, font size, font style, font family, text colour, background colour, and border of the box.
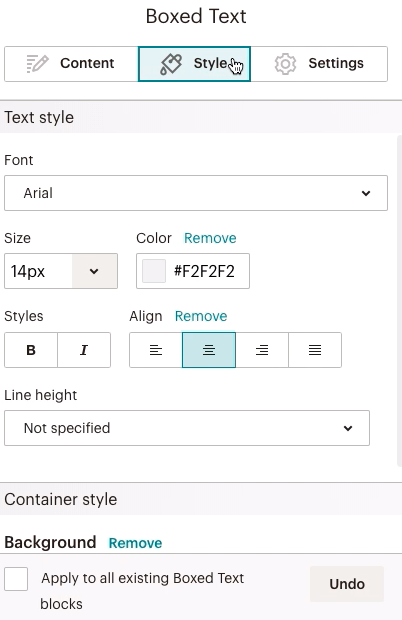
- If you wish to apply the Style to all existing Boxed Text blocks on the layout, select each of them and tick the next box, “Apply to all existing Boxed Text blocks.”
- Column Split is found on the Setting tab, where you can determine whether you’ll use columns and adjust their sizes.

- By using the toolbar present in the editing pane, you can apply Styling to just a few words in the content block, or apply Styling to the entire content block. You can edit and add content to the first and second columns if you select the Boxed Text block for two columns.
- Press Save and Close.
You should consider removing the extra formatting from the tested content if the styles you set don’t alter the text in standard ways.
Turn On Dynamic Content
Dynamic content can be used to display any content block only for specific recipients when designing an email. Using this method, you can send one email to a variety of contacts at the same time.
You can use Dynamic Content to display content only for individual recipients when designing an email. As a result, you can send a single email to different types of contacts simultaneously.
Other Ways of Using Boxed Text Block
- The written context can be wrapped around an image by inserting a picture and adjusting its alignment to the right or left.
- Create a layout with four columns. Add Boxed Text blocks to every queue, then choose a 2 column layout in the Template step. Now, fix every block to 2 columns in the Settings tab.
- Instead of the default social icons in Share blocks and Social Follow, choose customized social icons. You can upload your customized icons to the Boxed Text block and associate the pictures accordingly.
- Design a layout with different background colours for each Boxed Text block. Each campaign layout has its own background colour, such as the body, footer, and header.
Conclusion
We hope you enjoyed our article about how to add columns in Mailchimp. Using Mailchimp can help make your email campaigns more effective and organized. With the right knowledge, you can make the most of your email campaigns and never have to worry about missing a detail. So what are you waiting for?
Thanks for Reading!!!


![40 Best SEO Audit Tools Experts using in 2023 [Free & Paid]](https://quatmarketing.com/wp-content/uploads/2023/06/best-seo-audit-tools-120x86.webp)